PARTS LIST:
custom mount plate (2 qty #1 077 welded together)
9" black & white wires (one male & female on each) - plugged onto coil
12" of 5/32 airhose - plugged into 5/32 elbow & 5/32 male which is screwed into the coil brass hex plug screwed into coil
3 qty - wire ties
2 qty - #6 x 7/16 self-tap screws
- Elevate the table.
- Unplug power to table.
- Remove screws holding inner plastic skirt to the base and hold up the skirt with masking tape.
- Unplug two wires and air hose from the coil located on the air compressor. (Press the ring on the fit ting away from hose to release the hose.)
- The coil is attached to the compressor with a brass elbow. Swing the elbow up so that the coil clears the top of the compressor. Unscrew t he coil from the elbow.
- Unscrew the brass elbow from the compressor and replace it with the elbow fitting attached to the hose of the new coil.
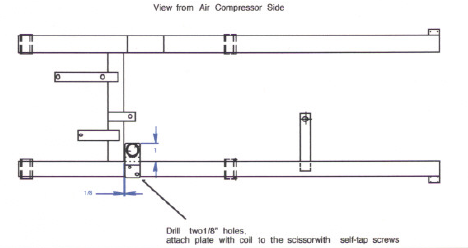
- Attach the plate for the new coil to t he scissor referring to the drawing "SCIS 3D", below.
- Plug the two new wires into the two wires you unplugged from the original coil in step 4.
- Plug original air hose into new section of hose on new coil.
- Use the enclosed wire ties to secure any dangling wires.