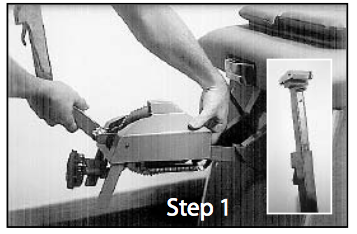
Step 1. Glide table top to the lumbar position. While holding the base plate handle up with the back of your hand (see photo), insert traction control unit into base plate at the head end of the table. Raise T-buckle assembly to the #4 position. (see caption).
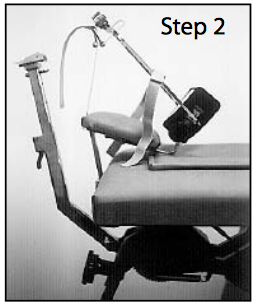
Step 2. Glide table top to cervical position and insert your Hill Cervical Device all the way into the bracket at the head end of the table. Do not attach the web strap in the buckle assembly at this time.
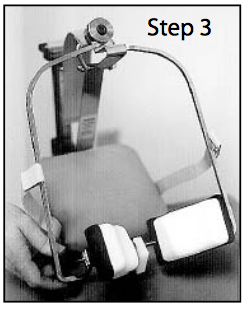
Step 3. Turn tension handle counter- clockwise to separate the two occipital cradle supports just enough to allow patient’s occipital region to rest easily within the supports. (Cradle support pads separate at a ratio of 1/16 of an inch per one handle turn so several turns may be necessary.)
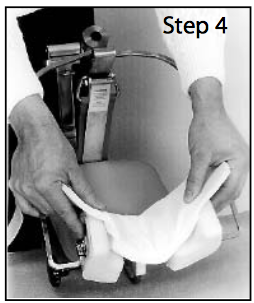
Step 4. Cover rectangular sponge insert with tissue and place it on upper edge of occipital cradle supports.
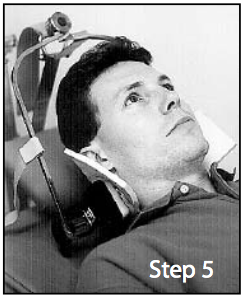
Step 5. Earrings should be removed and hair pinned up prior to positioning patient. While holding sponge insert in place, push the neck pads and ‘tongs’ (“A” Step 4) away from you, (towards the foot end of the table) so that the L bracket (shown as “B” in Step 7) is extended away from the head cushion. Position your patient in the Hill Cervical Device with the occipital area resting comfortably on the insert. Make certain that the pad cradles the head just under the occipital skull area and does not push on cervical area or surrounding tissue.
Step 6. Adjust tension handle clock- wise in order to apply a slight inward pressure on occipital region. Pressure should be sufficient to prevent any significant upward sliding of the occipital pads during the traction pull. Question the patient to make sure they feel a firm but comfortable inward pressure. Note: As you increase traction poundage, you may need to increase inward pressure to prevent possible slipping of the pads.

Step 7. Fold a tissue in half and place it on your patient’s
forehead. Secure velcro head strap over tissue so that
only slight pressure is exerted. If your patient is a child or
has a small head, the velcro strap may be taken out of the
buckle (see A) and fastened around the rod just below the
buckle to prevent the strap from slipping off the patient’s
forehead. Also make sure that the L-supporting bracket (see B) is an inch or two away from the head cushion. If not, have patient slide down slightly on the table until clearance is visible in bracket.

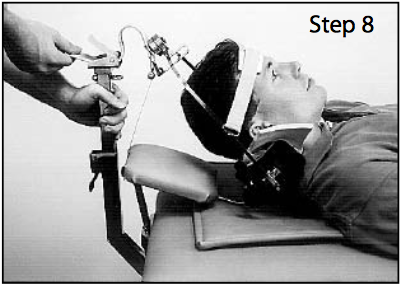
Step 8. Lift traction arm two or three inches towards the patient and attach the main strap through the T-buckle assembly. Dial traction control unit to zero poundage. Set time to start your table. Traction time is usually 7 to 10 minutes. Dial poundage to desired tension. Palpate the cervical region to determine if desired pull is being achieved. Again, to avoid slipping, tighten the occipital pads inward while dialing to a higher poundage.
Step 9. After treatment is finished, always detach the web strap from the T-buckle assembly and lower poundage dial to zero. Then release the head strap and open up the occipital cradle support to remove the patient from the Cervical Traction Device. Never run the table without a patient in the cervical traction device if the web strap is attached to the traction control unit. If you run the table without detaching the web strap after the patient is removed, you can do damage to your Cervical Device.
General Notes Concerning the Hill Cervical Device
When the T-Buckle is raised to the #4 position as shown in the caption of step 1, this creates a lever- age disadvantage for the traction unit. Therefore actual traction poundage should be calculated to approximately 2/3 of what the dial is set to. For example, with the traction dial set to 45 pounds, actu- al poundage is approximately 30 pounds. Average tension is usually between ten and thirty pounds; approximate treatment period is 7 to 10 minutes. Slowly increase poundage over future treatments; avoid applying heavy traction poundage at first. Upper back rollers can be used in conjunction with cervical traction. If the angle of pull is too severe, back rollers can be lowered and a filler block insert- ed. In addition, the unfolded pillow can be placed under the patient’s shoulder area. This will raise the patient and flatten the angle of pull they are receiving.
This type of traction is extremely comfortable. It offers effective cervical traction without incurring the chin discomfort often caused by traditional cervical devices.
WARNING - Avoid using on patients with severe vascular insufficiencies. If lightheadedness or dizziness occurs after treatment, the occipital pads might be causing unnecessary pressure on the cervical area and surrounding tissue. In future treatments, patient should be repositioned so that pads grab just the occipital area.