- Unplug the table.
- Remove the plastic enclosure from the base. Be careful of the wires attached to the power button and speed knob which are on the front section.
- The cushions will remain on each section of top frame. There is a vinyl flap that is stapled to both cushions. The staples can be removed from one side if you have a heavy staple gun to reattach the vinyl or you will need the assistance of other people to remove and move both cushion/frame assemblies together as one unit.
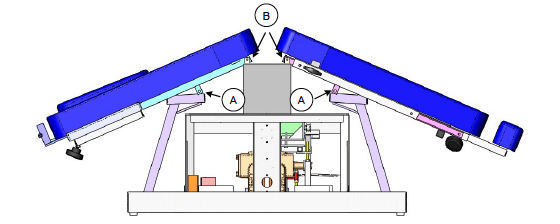
Remove the shoulder bolt at the pivot point (A). Remove the two small shoulder bolts (B) that secure the frame to the center weldment.
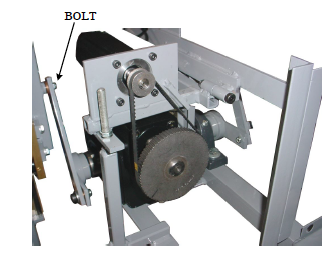
4. Remove the shoulder bolt from the top end of the push rod on both sides of the table. This will allow you to pull the center frame straight up and off the rails.
NOTE: The new carriage will have a piece of foam in it. Leave it in the slot until ready to slide the carriage onto the rail.
5. Remove the four screws securing each original carriage to the welded frame.
6. Rest an object under the bottom end of each rail to prevent the carriages from sliding off the bottom end of the rail during the next step.
7. You will need to be very gentle with this step. Slide the foam out of the first carriage and hold it VERY straight as you slide it onto the rail so that no tiny steel balls get pushed out the top of the carriage housing; SLOW and gentle until the entire carriage is on the rail. Let it rest on the object you placed under the rail.
If any steel balls appear on top of the rail, stop, and remove the carriage. Gather every steel ball that get pushed out and call Hill Laboratories, 1-877-445-5020. Someone in Product Development will explain how to reinsert them.
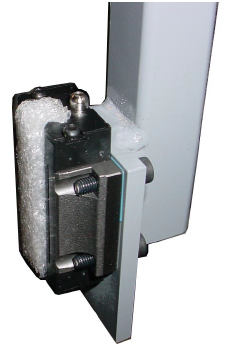
8. Hold the painted frame between the carriages and insert two M5 socket head screws in each carriage with your fingers, enough to hold the frame in place. Insert each screw through the plate and then into the carriage. See photo.
9. Add two drops of blue thread locker to the threads of each of the remaining four screws before inserting them. Hold the frame straight and tighten the screws with a hex wrench.
10. Add blue thread locker to the first four screws and tighten them with a hex wrench.
11. Reverse steps one through four to reassemble.