DISTRACTION - Replace Lumbar Actuator:
NOTE: The limit switches have already been set at the correct location on the new actuator.
Include WIRE 57B
- Use the hand switch to elevate the table and then UNPLUG the table.
- Remove the screws securing the plastic cover that encloses the actuator under the leg cushion.
- Remove the screws that secure the large plastic enclosure to the top frame.
- From the Top- Remove the screws securing the aluminum cover over the electronics.
- Use a small screwdriver to disconnect the wires of the limit switch from the board at terminals 1,2,& 3.
- From Below- If a second person is available to hold the actuator, remove the four screws securing the actuator to the frame, let them support the actuator, and proceed to the next step. If you no one is available than proceed to next step.
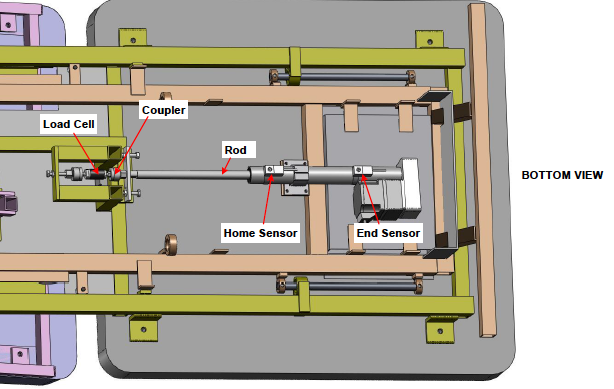
- While holding the load sensor with your fingers so that it does not turn, use a 9/16" wrench to loosen the alignment coupler from the plate. Continue turning the coupler until it is free from the actuator rod. If the actuator is still attached to the frame (reference step 6) than the coupler will turn a little tighter because, as it is threading out, it is moving the pelvic cushion assembly.
- Remove the four mounting screws from the actuator if it is still on the frame (reference step 6).
- Reverse Steps 5-8 to attach and connect the new actuator. Test the table
- Reverse Steps 1-4 to complete.